You will Need:
– Medium sized pot
– Small ceramic dish
– Aluminum Foil
– Oven bag (the kind used for cooking)
– Baking sheet
– Candy thermometer
– Wax paper
– Cheesecloth, optional (needed for larger quantities of herb)
– *Double boiler
– 5 grams of hash or 14 grams of herb
(*if using a microwave chocolate, add the
additional canna oil in the peanut butter and
increase powder sugar accordingly, and the
double boiler pot/s are no longer required,
unless making herb oil rather than hash oil.)
Peanut butter balls:
– 2/3 cup peanut butter
– 2 – 2 ½ cups confectioners sugar
– ½ tsp vanilla extract
– 1/2 + cup butter and/or coconut oil – you can get away with less oil by using hash,
this way, you won’t dilute the peanut
butter flavor quite so much with oil and sugar.
Chocolate coating:
– Any hard, dark bakers melting chocolate or chips, roughly ¾ – 1 cup.
– 2/3 tsp coconut hash oil (works better than the butter alternative, but use no other oil)
– Paraffin/baking wax
Optional, (recommended)
– lecithin powder
Optional (for “fuse”)
– thick cotton cooking string, or white yarn
– paraffin wax
– ceramic dish, or a small home-made ‘foil bowl’
Heat your oven to 200 and melt a small portion of paraffin wax in a small ceramic dish, takes only 2 – 3 minutes… it can be very carefully microwaved, or heated slowly on the stove-top, but it’s MUCH, much safer and more controlled in the oven, and at a set temp.
Carefully remove the paraffin from the oven with a potholder, it will be very warm, so set it on a safe surface. Begin dipping the strings, tied end first, into the paraffin, coating the yarn well. If heated in the oven at 200, it should be cool enough to grab by the opposite end once dipped, to flip and coat the entire string. Be quick, or you’ll be reheating your paraffin a few times! The wax helps keep the ball formed around the string, and it also prevents stray strands of string fiber from being eaten by you, or your patients or guests.
Now you are ready to add your oils, and lecithin.
I like to use a combination of oils, both for flavor, and to create a varied oil ‘vehicle’ for cannabinoid bonding and availability, some thinner and some thicker. In the end, you want it to be a solid at room temp, so your canna balls aren’t too soft, and the chocolate keeps its shape and thickness. The additional liquid oils I’ve used in addition to the solids, had previously been infused with herb.
Ideally, you should be using butter and/or coconut oil, about 1.5 Tbsp worth for your hash. If this is your primary or only canna oil source, you’ll be adding an additional 2 x Tbsp of softened butter to the peanut butter filling, later on.
And your double boiler, with your melted oils and lecithin over a low heat.
(I am using slightly more oil, knowing that with this much herb, a small but noticeable quantity of oil will be left behind):
Cover tight with foil, using the foil to seal the thermometer in place, keep between 180-200 f, turning off the heat periodically as it rises. This is what it looks like after about ten or so hours:
Allow to cool somewhat, so it’s only warm to the touch, and set up your cheesecloth.
Now, you can begin straining.
When using this much green for such a small amount of oil, I know there will be some potent material left within the herb that is worth keeping, so I save and freeze the green for a future run, and use only the oil.
But knowing you’ll be using a smaller amount, and if it was initially ground finely enough, you can choose to add it all directly to the peanut butter.
Now with one (or both ) of these oils, you’re finally ready to make the peanut butter balls!
On to the peanut butter balls:
In a mixing bowl, you’ll be blending your peanut butter, vanilla, and all your canna oil except for roughly 2/3 tsp which will go in the chocolate (only if made with butter and/or coconut oil, otherwise, use it all in the peanut butter) first. If only using hash oil, remember to add a few Tbsp of additional butter at this point.
Once that is done you should have an oily peanut butter goo, and you’re ready to begin mixing in your powdered sugar, until it reaches a consistency that will hold shape, and not crumble.
You’re now ready to make the peanut butter centers, using the ‘fuse’:
Cover the base of a cookie sheet or baking pan with foil or wax paper.
Take enough peanut butter filling, so that when rolled, it should create roughly a 1.25 – 1.50” diameter ball.
Once it’s balled up, insert the ‘fuse’ about half-way through the ball, KNOT-END FIRST, then gently squeeze and reform, the ball making sure that it’s stable. If you’d like, you can place them down gently but firmly on the foil or wax paper, just enough to create a ‘flat’ on the very base, to keep them from rolling around.
Having the fuse-knot in the center holds it in very snug, and prevents the fuse from slipping around and falling out, or crumbling the peanut butter, and you can carefully bend the fuse so it looks decorative, or more ‘cartoon-ish’.
Pop the tray into the freezer, for no longer than 20 minutes (while you complete the following).
Chocolate coating:
This can be as simple or tedious as you like. If you’re not adept in the kitchen or familiar with tempering chocolate I recommend using all your hash/canna oil in the peanut butter ball portion, disregard the double boiler, and using one of the newer, more simple microwavable melting chocolates, which are designed for easy consistent use.
Otherwise, you may be frustrated when the consistency fails and it’s more of a lumpy sauce, than a coating.
What I do, using a double boiler pot, is grab a handful of semi-sweet, dark, and milk chocolate baking chips, concentrating on the dark and semi-sweet, and slowly melt them over the lowest heat possible using a double boiler.
Once the chocolate is melted, I add my hash oil, blend, and then I begin shaving small amounts of paraffin into the chocolate. I’ll blend again, then drop a little on wax paper. Once it stays nice and solid, it’s ready. Remove from heat.
If you choose to make your own chocolate coat, but without adding additional canna oil, there is no need for the paraffin: just temper as usual, and they will be much shinier this way. Remember the smaller and taller the pot, the easier it will be to use as a coat.
Remove your peanut butter balls from the freezer (or the refrigerator, if you waited longer than 20 minutes) and grab them one at a time, by the fuse.
Quickly dunk each ball in the cooling chocolate, and place on your wax paper.. a new sheet can be used, or you can carefully return each ball to the last.
The cold temperature of the peanut butter ball will rapidly solidify the cooling chocolate, this is why it’s best to work fast and use the freezer rather than the fridge for the balls, the outer edge becomes colder than it can in the fridge, without allowing the center to become frozen (which can cause crumbling/cracking in the center around the fuse, when dunked into the warm chocolate).
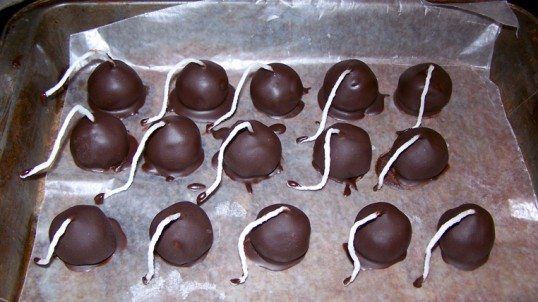
After dunking each ball, take a spoon and using the excess chocolate, place a small drop on the end of each fuse… now they’re lit
Pop them in the freezer, and you’re done! You now have 18 – 20 of the most potent desert-edibles you can find… with folks eagerly awaiting a sample, you can see that three BOMBs had already gone ‘MIA’, before I even had a chance to finish dipping the full batch
If you’re not using them right away, I recommend letting them sit for a few hours, as they are on the pan, while freezing.
Then, like any stored edible, you can remove them and place them inside an oven bag within a tupperware container, or even a small safe, properly installed in your freezer… this is what I recommend to any parents, who need to keep meds out of the hands of curious minors.
Storing them first in oven bags, helps to prevent freezer burn and outside odors or flavors from seeping in, retaining their flavor, so they don’t become spoiled by the environment outside the bag.
Tip: Any excess, hashy chocolate that you may have left over from the dunking, can be poured to harden into a chocolate mold, or a small tray lined with wax paper, making a great edible all on its own.
This is a Bad Kats collection recipe!